
This here blog is no longer functional! So, if you’re reading this in a feed (or for some strange reason aren’t automatically redirected, update your link/bookmark and head on over to plantingsequoiasblog.com! It’s nice over there, so don’t be scared. Seriously.
Farm Apartment: Framing Exterior Walls (in which Kenny and I invent our own form of marriage counseling)
As you might have seen from my instagram feed (it’s fascinating, really), framing on the apartment has begun!
My grandpa got a jump on assembling the walls before we were even finished laying the deck. The walls are assembled on the floor and then hoisted in large pieces. In the picture below, you can see a wall just waiting to be lifted into place.

Three things to note in the picture above: The large space in the far wall will be where a window will go. Grandpa also took the time to notch out small sections in each of the end walls (you can see the notches in the picture above). Later we’ll put 2x4s through them and they’ll be an anchor for the steel exterior of the barn. Last thing: the darker boards in the picture above are the old joists from the ceiling! Waste not, want not, right?
We got busy putting up the first wall when the sun was setting. It was pretty beautiful.

In many ways, the process went fast and was extremely gratifying visually. But in other ways, there was a lot of busy work that occurred too–the walls have to be precisely placed and level and then each wall section needs to be braced. We only got a little more than 1 wall up that first night. We=basically the whole fam: Grandpa, dad, uncle, Kenny, and yours truly, hanging out with the men and hoping they don’t notice.
My youngest brother and his friend put up the next wall. No worries–he does this for a living now.
And then it was time for Our wall.
Oh yeah, did I tell you that Kenny and I erected an ENTIRE wall? BY OURSELVES? And SURVIVED, marriage intact?
Because we did.

(studmuffin)
There are obviously no pictures of the project in process because I was lifting, hauling, leveling, nailing, and bracing massive walls. That’s my excuse, and I think it’s a good one.
Here’s the wall we put up ON OUR OWN. Nail guns, ladders, bracing, and everything.

And hold on. Do you see that large gaping hole in the floor? In the picture above?
That, my friends, is going to be where the stairs come up. But for now, it’s just a gaping hole. THAT KENNY AND I HAD TO MANEUVER BAJILLION POUND WALLS AROUND. Without falling into, ideally.
I won’t say there were no arguments throughout the process, but I will say that this was an excellent lesson in working together and trusting each other.

I think both Kenny and I feel pretty proud of ourselves after that day.
Oh, and I had to include this picture my sister instagrammed from the first day. Who knew construction work could be so beautiful and glamorous looking?

Sheesh. Over and out.
Transformed Thrift Store Artwork (in which painted velvet is actually a good thing)
So. You remember this ugly piece of thrift store artwork I picked up for $5 here, right? I know, I know, how could you forget this nightmarish painting? It’s downright scary. My apologies. Ken shrieked when I brought it home, poor guy.

But no worries. I used oil paints for the first time and it actually turned out pretty cool-looking. Except for the frame.

So I polled you guys since I was sincerely bamboozled. Many chimed in with GREAT ideas, so click over to that post if you are ever in a dire situation like this. (HA). Pretty sure no one’s had this problem ever.
I ended up diving in headfirst by painting the velvet-y strip of the frame navy. I’ve done this before, on this frame, and it worked out well then. It does get stiffer, but after 50ish years, these velvet bits aren’t exactly something you want to rub your face on anyway.

It dried SUPER quickly (YAY) so I flipped the frame over and secured the oil painting in its grasp. Also–I painted on the backside of the painting if, justincase I ever wanted to, I don’t know? flip it over and use the original gross side? Completely unnecessary, now that I think about it.

I’m in love with the painting and how easy it was. KEY: use lots of white. When I didn’t, things got murky FAST.

It now hangs in the 12 square feet that is our hallway, between our bedroom on the left and bathroom on the right.

I left the outer creamy portion of the frame as is for now. I’m still mulling over whether or not I want to paint it. It’s currently acting as a nice bridge color between our creamy walls and the bright white in the painting.
Oh, and I made a nice (PINNABLE, hint) before and after image so you could see the contrast without scrolling up.

So, for $5 and the cost of paint (maybe $6? I had a giftcard), we now have a sweet custom piece of artwork.
Moral of the story: don’t pass up ugly pieces of art in the thrift store, but don’t show it to your husband before you transform it. Things go much better that way.
Farm Apartment: Laying the Deck (in which I wield a nail gun like a boss)
If you’re a construction worker, this “Farm Apartment” blog series might make you go “huh?” but hopefully that’s okay because for your sake I am skipping over some of the more boring parts. It is entirely coincidental that those boring parts just happened to be very stressful to the point where I forgot to take pictures.
Which is a bummer, because a crane was involved.
While the open sky look can be quite lovely, it is not conducive for shelter during rainstorms. And if you have no idea what I’m talking about, you can catch up by reading this post first. Yes, we’re building a second story onto a formerly flat-roofed barn.
Anyway, let’s talk about the crane, since that was the best/most stressful part. Dad ordered these fancy joists (they looked like these) that were made up of two 2x4s and some plywood. Apparently they’re very strong, and very heavy–thus the crane. The truck driver who delivered them also doubled as a crane driver which was conveniently a part of the truck itself. He hoisted up those joists and plopped them right onto the roof as if they were pick-up sticks–except with way more serious consequences if something went wrong.
Once we had the joists, it was simply (HA) a matter of spacing them across the beam and walls every sixteen inches and nailing them in. Nevermind that each joist weighed a ton apiece (almost) and were about 40 feet long.
Then came some less stressful progress–the “deck”! Apparently this platform is not called a “floor;” no, that would be entirely too logical.
Using the farm’s forklift, Dad lifted up a stack of 4×8′ sheets of underlayment and we got to building.

(Picture from my sister’s Instagram feed.)
My job was affixing everything with the nail gun, since wrangling the large sheets of underlayment into place was not my forte. Which was fine with me–nail-gunning makes one feel quite powerful.
We got halfway done the first day and finished up on the second evening we worked on it.
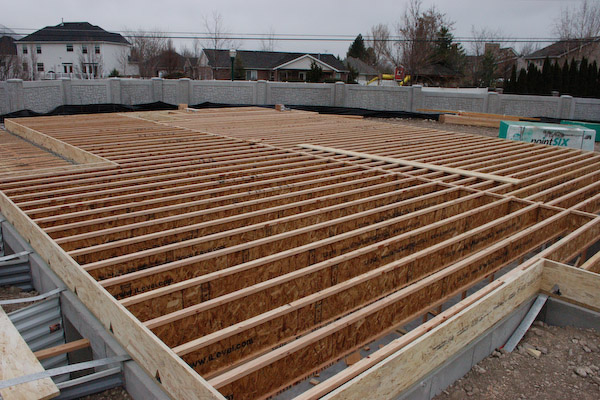
In the picture below you can see that half of the deck has been laid (in the foreground) and half has yet to be laid.

My grandpa got a jump on the framing of the second story by assembling the walls (you can see them lying down) before we’d even finished the deck.
With the underlayment down, it is nearly time to begin framing!
And that will wait for another post. Bwahaha.
I’m just happy we don’t have to walk from joist to joist (in mortal peril) anymore. I have great balance, but it’s somewhat unnerving to step over gaping holes into which you could quite possibly plummet with any misstep.
Also–can I just point out how great the view is from our construction site? Nothing like looking out over the fields at sunset!
Anyone else want to share their nail-gunning experience? Or desire to learn? I am basically an expert now. 🙂
Gray Shabby Chic End Table (in which I make Ken an accomplice by driving the getaway car)
You might recall that a few weeks ago, I found a veritable treasure trove of dumpster goodies over the span of just a few days.
It was a delightful time in my life, but for Ken, these few days were very stressful and, in his mind, completely and utterly embarrassing.
I mean, I get it. It takes someone with a strong sense of self to march up to a dumpster and claim someone else’s cast-offs.
While Ken doesn’t have the gumption to do that just yet (he’s in training), he does love me an awful lot, so he can sometimes be convinced to drive “the getaway car.”
Now, this role is very important, don’t get me wrong! Our apartment complex seems quite massive when you think about lugging a few dozen pounds of awkwardly shaped furniture across several parking lots.
So on this particular day, Ken drove one very-excited me over to the dumpster and I hopped out and wrangled the finds into the car. Did I mention it was raining?
Even though there was no one in sight, Ken kept glancing around to see if anyone would notice our dastardly deed. The man still has yet to come to grips with the fact that if someone puts things in/by the dumpster, said things are no longer wanted.
Unfortunately for Ken, his loving wife has the gall to post all about these escapades on the internet. Poor man.
But I digress. Back on topic: These sidetables.

I immediately got to work on them while Ken hid embarrassed in the apartment, Or maybe he was studying for the Bar exam. One or the other.
I was particularly excited about the table on the left in the picture above. It was your average dark-wood laminate table with sleek contemporary lines.
The other end table, while it had a lot of potential (despite the missing drawer), got the boot. This is a sad story, so brace yourself.
One of us (either Ken or Anne, not naming names) accidentally left the keys in the door of our apartment one night. OVERNIGHT. Unfortunately, this is not the first time this has happened.
While we were thankfully not murdered in our bed, some well-meaning neighbor DID remove said keys and they were unaccounted for for about 8 hours.
During that 8 hours, Ken went into survival mode. He called the locksmith to see about changing the locks. He called the car dealership to see about getting a new key fob made since yes, our new car’s key was on that keyring. And, worst of all, he announced that we would have to start parking the car in the garage again.
This was, sadly, a logical move, one with which I could not argue. Though someone somewhere had our car’s keys, if we parked the car in the garage, it would in theory be more safe since we maintained possession of the garage door opener.
This meant that Anne’s furniture finds were being evicted. The headboard (which I sold for a cool $85 last week) stayed since it was slender, but I had to tote the curved-leg end table back to whence it came. From whence it came? What’s the phrase? Anyway, it went back to the dumpster, along with another end table not pictured above.
But the sturdy laminate end table to the left got special treatment and a special spot perched precariously atop our boxes of camping gear.
You see, I had just listed it on Craigslist, after giving it a glorious makeover. Behold:

Though laminate (yes, I learned my lesson here), it took the paint much better than the headboard did without primer. So sometimes painting shortcuts do work? Not sure what the lesson is in this story.
I distressed this piece as well and listed it on Craigslist as shabby chic (even though I greatly dislike that term for no good reason).

While I’m not the hugest fan of the cottage-y style look, I do on occasion like a good distressed piece, if for no other reason than the fact that it can take a beating and still look awesome/rustic.

It is currently awaiting a lovely new home though yeah, I’ll be sad to see this piece go as well. Perhaps someday I can start a home for abandoned pieces of furniture, but right now, our 670 square feet doesn’t cut it.
Oh, and the keys? The same neighbor that found them the last time we lost them found them again. We need to give that man a medal or something. Or permanently attach the keys to our body so they don’t get left in the lock. Or both.
Anyone else have a good dumpster-find story? or a good key-losing story? or need a shabby chic (bleagh) side table?
